When configuring vSphere Replication between 2 vCenter Servers, you need to add a dedicated VMKernel to each host in the source & target vCEnter Server clusters. Depending on the number of hosts per cluster, this can be a time-consuming manual task. Here is a quick script leveraging PowerCLI to retrieve the hosst from a specified cluster and loop through them adding a dedicated vSphere Replication VMKernel.
#Source VC vmks
$vCenterServer = "sfo-m01-vc01.sfo.rainpole.io"
$vCenterServerUser = "administrator@vsphere.local"
$vCenterServerPassword = "VMw@re1!VMw@re1!"
$clusterName = "sfo-m01-cl01"
$PortGroupName = "sfo-m01-cl01-vds01-pg-vlr"
$VLANID = 1116
$VSwitch = "sfo-m01-cl01-vds01"
$VMKIP = "10.11.16."  # last octet will be incremented
$lastOctetStart = 101
$SubnetMask = "255.255.255.0"
$mtu = 9000

# Connect to vCenter
Connect-VIServer -Server $vCenterServer -user $vCenterServerUser -password $vCenterServerPassword

# Get Esxi hosts in cluster
$ESXiHosts = Get-cluster -name $clusterName | Get-VMHost

# Loop through each host and add an adapter with vSphere Replication Services enabled
$index = $lastOctetStart
foreach ($ESXi in $ESXiHosts) {
    Write-Host "Processing host: $ESXi"

# Define VMkernel IP for this host
    $VMKIPAddress = "$VMKIP$index"
    $index++

# Add VMkernel adapter
    Write-Host "Adding VMkernel adapter $VMKIPAddress to $ESXi"
    $vmk = New-VMHostNetworkAdapter -VMHost $ESXi -VirtualSwitch $VSwitch -PortGroup $PortGroupName -IP $VMKIPAddress -SubnetMask $SubnetMask -VMotionEnabled $false -mtu $mtu
    $vnicMgr = Get-View -Id $ESXi.ExtensionData.ConfigManager.VirtualNicManager
    $vnicMgr.SelectVnicForNicType('vSphereReplication',$vmk.Name)
$vnicMgr.SelectVnicForNicType('vSphereReplicationNFC',$vmk.Name)

    Write-Host "VMkernel adapter added successfully on $ESXi"
}

# Disconnect from vCenter
Disconnect-VIServer -Confirm:$false
As part of my series on deploying and managing VMware Cloud Foundation using Terraform, this post will focus on deploying the VMware Cloud Foundation Cloud Builder appliance using the vSphere Terraform provider. I’ve used this provider in the past to deploy the NSX Manager appliance.
Check out the other posts on Terraform with VMware Cloud Foundation here:
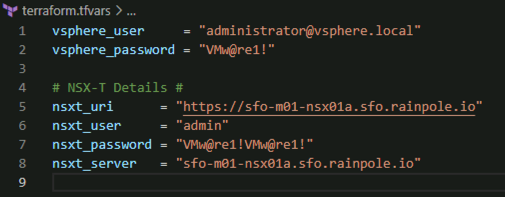
Note the vCenter Server credentials in the above variables.tf do not have default values. We will declare these sensitive values in a terraform.tfvars file and add *.tfvars to our .GitIgnore file so they are not synced to our Git repo.
Now that we have all of our variables defined we can define our main.tf to perform the deployment. As part of this, we first need to gather some data from the target vCenter Server, so we know where to deploy the appliance.
# main.tf
# Data source for vCenter Datacenter
data "vsphere_datacenter" "datacenter" {
name = var.data_center
}
# Data source for vCenter Cluster
data "vsphere_compute_cluster" "cluster" {
name = var.cluster
datacenter_id = data.vsphere_datacenter.datacenter.id
}
# Data source for vCenter Datastore
data "vsphere_datastore" "datastore" {
name = var.datastore
datacenter_id = data.vsphere_datacenter.datacenter.id
}
# Data source for vCenter Portgroup
data "vsphere_network" "mgmt" {
name = var.mgmt_pg
datacenter_id = data.vsphere_datacenter.datacenter.id
}
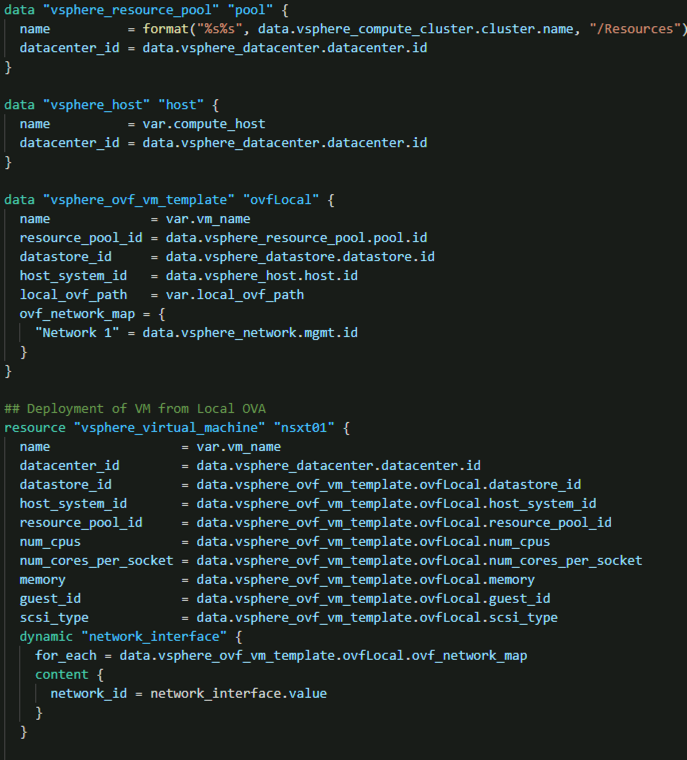
# Data source for vCenter Resource Pool. In our case we will use the root resource pool
data "vsphere_resource_pool" "pool" {
name = format("%s%s", data.vsphere_compute_cluster.cluster.name, "/Resources")
datacenter_id = data.vsphere_datacenter.datacenter.id
}
# Data source for ESXi host to deploy to
data "vsphere_host" "host" {
name = var.compute_host
datacenter_id = data.vsphere_datacenter.datacenter.id
}
# Data source for the OVF to read the required OVF Properties
data "vsphere_ovf_vm_template" "ovfLocal" {
name = var.vm_name
resource_pool_id = data.vsphere_resource_pool.pool.id
datastore_id = data.vsphere_datastore.datastore.id
host_system_id = data.vsphere_host.host.id
local_ovf_path = var.local_ovf_path
ovf_network_map = {
"Network 1" = data.vsphere_network.mgmt.id
}
}
# Deployment of VM from Local OVA
resource "vsphere_virtual_machine" "cb01" {
name = var.vm_name
datacenter_id = data.vsphere_datacenter.datacenter.id
datastore_id = data.vsphere_ovf_vm_template.ovfLocal.datastore_id
host_system_id = data.vsphere_ovf_vm_template.ovfLocal.host_system_id
resource_pool_id = data.vsphere_ovf_vm_template.ovfLocal.resource_pool_id
num_cpus = data.vsphere_ovf_vm_template.ovfLocal.num_cpus
num_cores_per_socket = data.vsphere_ovf_vm_template.ovfLocal.num_cores_per_socket
memory = data.vsphere_ovf_vm_template.ovfLocal.memory
guest_id = data.vsphere_ovf_vm_template.ovfLocal.guest_id
scsi_type = data.vsphere_ovf_vm_template.ovfLocal.scsi_type
wait_for_guest_net_timeout = 5
ovf_deploy {
allow_unverified_ssl_cert = true
local_ovf_path = var.local_ovf_path
disk_provisioning = "thin"
ovf_network_map = data.vsphere_ovf_vm_template.ovfLocal.ovf_network_map
}
vapp {
properties = {
"ip0" = var.ip0,
"netmask0" = var.netmask0,
"gateway" = var.gateway,
"dns" = var.dns,
"domain" = var.domain,
"ntp" = var.ntp,
"searchpath" = var.searchpath,
"ADMIN_USERNAME" = "admin",
"ADMIN_PASSWORD" = var.ADMIN_PASSWORD,
"ROOT_PASSWORD" = var.ROOT_PASSWORD,
"hostname" = var.hostname
}
}
lifecycle {
ignore_changes = [
#vapp # Enable this to ignore all vapp properties if the plan is re-run
vapp[0].properties["ADMIN_PASSWORD"],
vapp[0].properties["ROOT_PASSWORD"],
host_system_id # Avoids moving the VM back to the host it was deployed to if DRS has relocated it
]
}
}
Now we can run the following to initialise Terraform and the required vSphere provider
terraform init
One the provider is initialised, we can then create a terraform plan to ensure our configuration is valid.
terraform plan -out=DeployCB
Now that we have a valid configuration we can apply our plan to deploy the Cloud Builder appliance.
Playing with Terraform has been on my To-Do list for a while now (it’s a long list 🙂 ). Over the past couple of weeks i’ve been spending time in my homelab getting familiar with it and figured i’d create a blog series that may help others.
So where do you start? There are lots of resources on the web to get started. From blogs to Pluralsight courses. The Terraform documentation & provider documentation in the Terraform Registry is also very good and usually has what you need.
For my setup i use Visual Studio Code. I flip between my mac & a windows jump vm in my homelab, and VSC works seamlessly on both. I’ve installed the following VSC extension:
Read alphabetically and actioned when you plan/apply/destroy your config (more on that later)
A single main.tf file can contain everything your infrastructure plan requires:
Provider
Variables
Data Sources
Resources
Recommended to split these out for larger environments
providers.tf
You must declare required_providers and then a provider block for each provider.
You can use alias = “alias_name” if you want to have multiple instances of a provider.
In the screenshot below the credentials are coming from variables defined in my terraform.tfvars file
variables.tf
List of variables to be used in the configuration
Written in Hashicorp Configuration Language (HCL) (or JSON)
Sensitive variables such as credentials or access keys should be stored in Terraform variable definition files .tfvars or stored as environment variables.
Use a Terraform.gitignore file to ensure your .tfvars with sensitive information are not committed to your git repo.
Data Sources & Resources can be in a single file or split out into logical infrastructure files
network.tf
deploy_vm.tf
etc
Terraform Commands
Once you have your configuration defined you first want to validate that it will run
terraform plan -out=plan-name
# This will evaluate your configuration to ensure it is valid and store the result in a file called "plan-name"
terraform apply plan-name
# This will apply your configuration based on the output of the above plan. You will be asked to confirm this action. you can add -auto-approve to skip the confirmation (use with caution)
terraform destroy
# This will destroy the configuration. You will be asked to confirm this action. you can add -auto-approve to skip the confirmation (use with caution)
Hopefully this was helpful. This is just scratching the surface to get started with Terraform. I recommend getting hands on and reading the documentation as you go. I will continue this with a post on using the vSphere provider to deploy an OVA. Stay tuned!