VCF Recovery Models

Protection & more importantly, recovery of VMware Cloud Foundation (VCF) is something I and Ken Gould have worked closely on for a number of years now. Whether it was a VVD based deployment or in more recent years, a VCF deployment, we have tested, validated & documented the process & procedures you need to follow to be successful, should you need to recover from a failure.

When we talk about VCF Recovery Models, there are 3 main pillars.
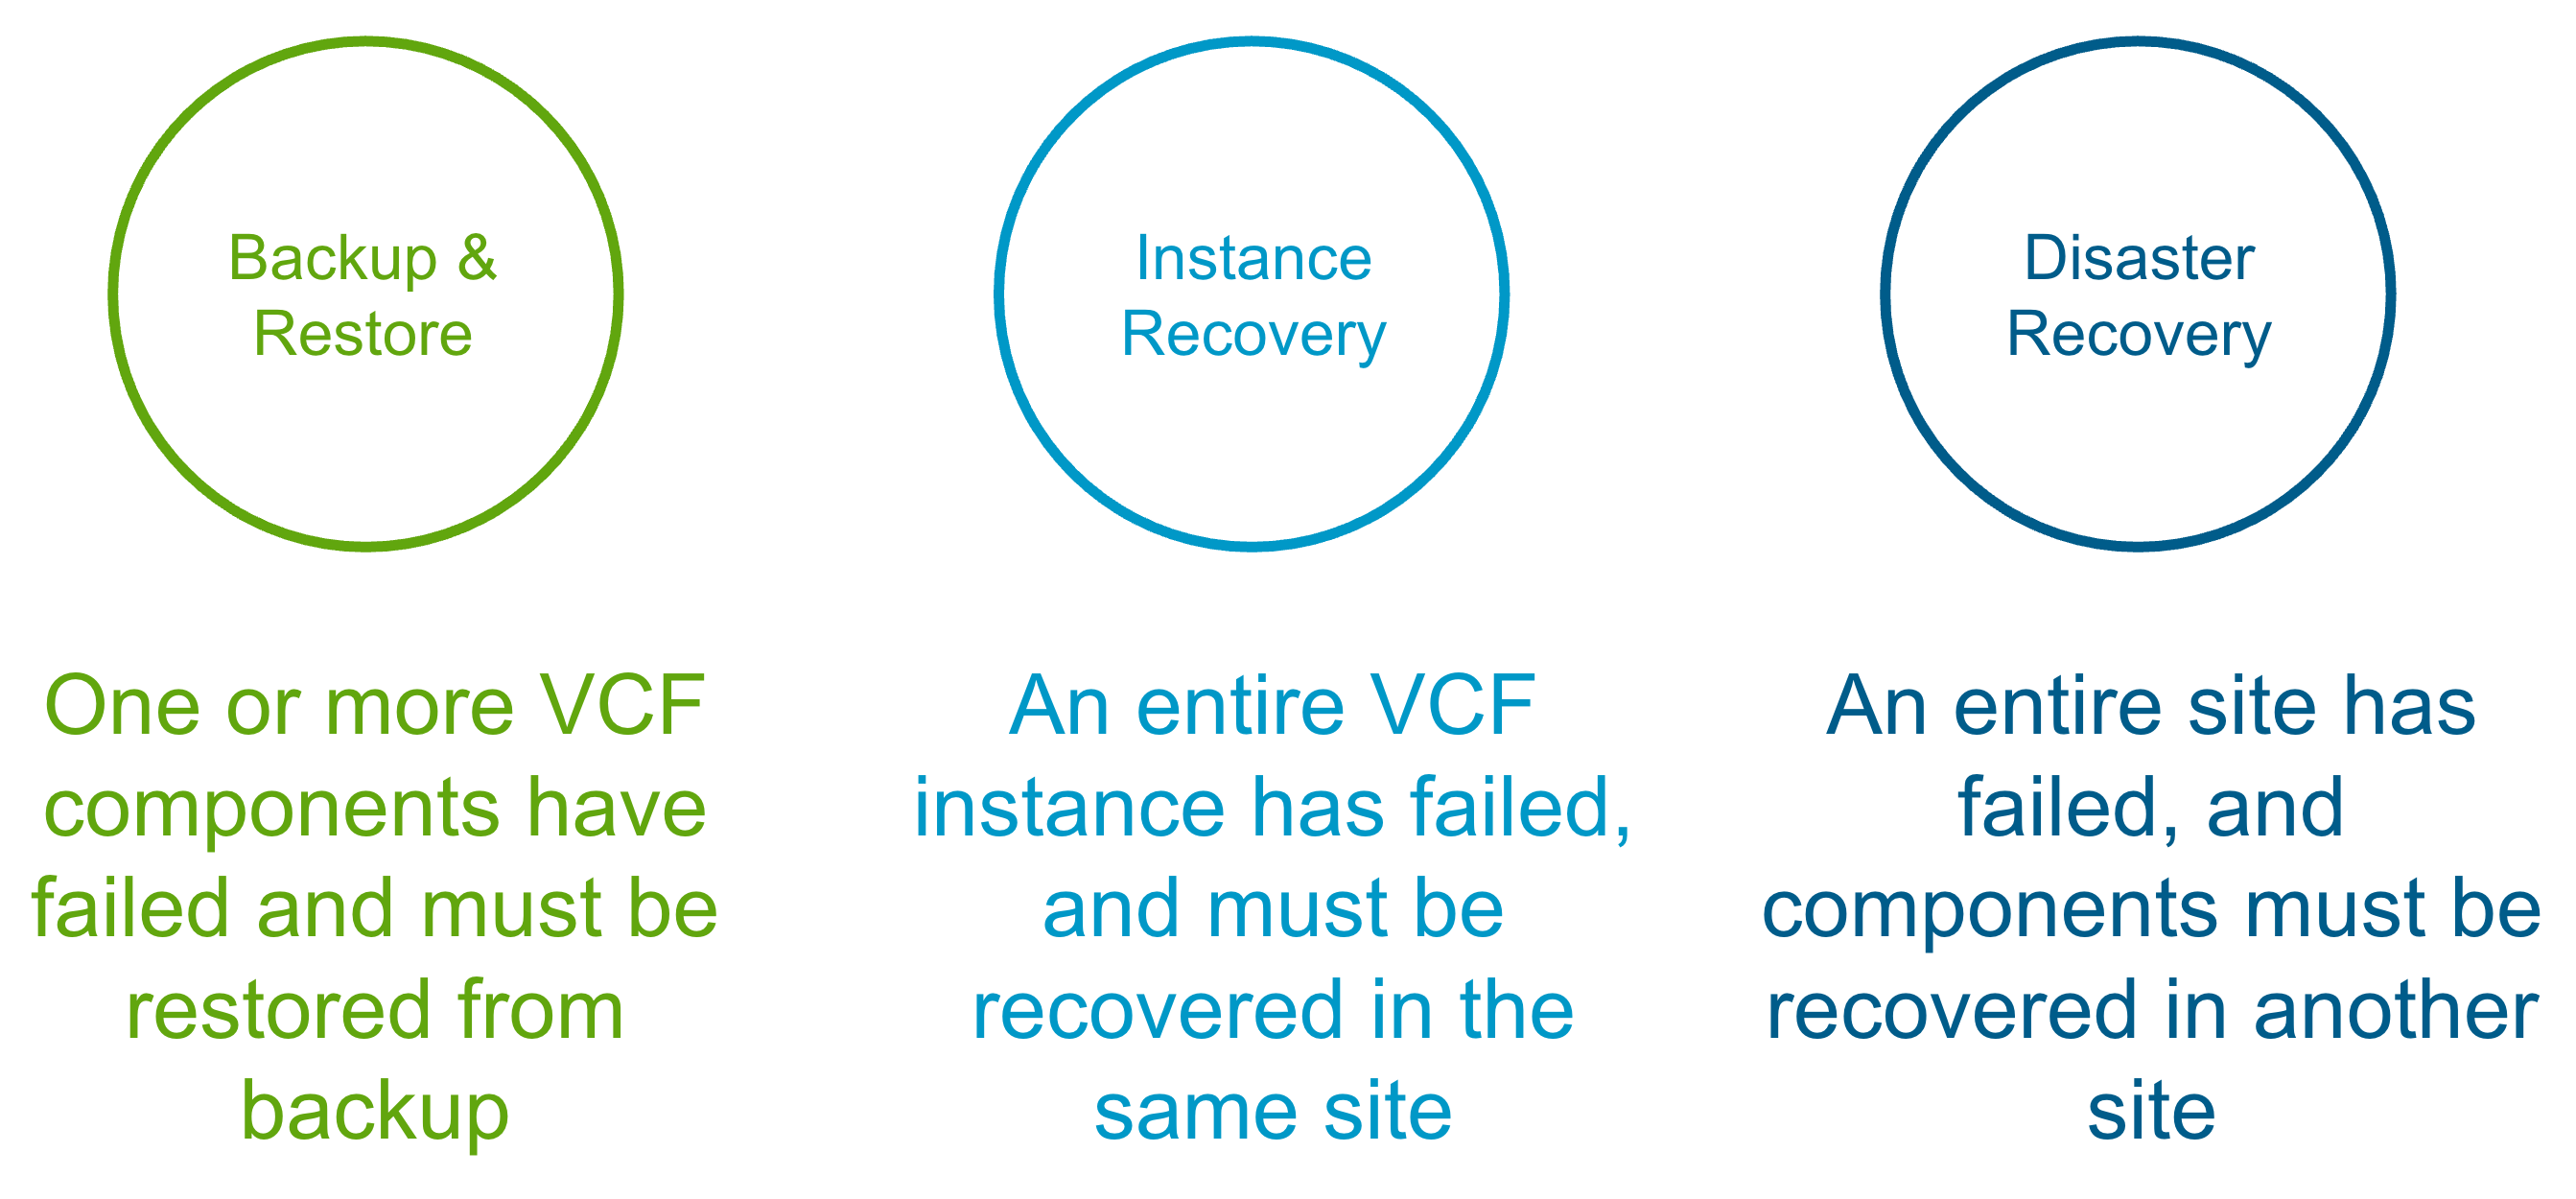
Backup & Restore

This is the traditional scenario, where one or more components have failed and you need to recover/restore them in-place. The table below shows what is required for each VCF 9.0 component in the event of a single component failure. https://techdocs.broadcom.com/us/en/vmware-cis/vcf/vvs/9-X/site-protection-and-disaster-recovery-for-vmware-cloud-foundation.html

The VCF 9.0 documentation for component-level backup & restore covers the manual steps required to configure backup for each component, and then how to recover/restore each component, and is available here https://techdocs.broadcom.com/us/en/vmware-cis/vcf/vcf-9-0-and-later/9-0/fleet-management/backup-and-restore-of-cloud-foundation.html

VCF Instance Recovery

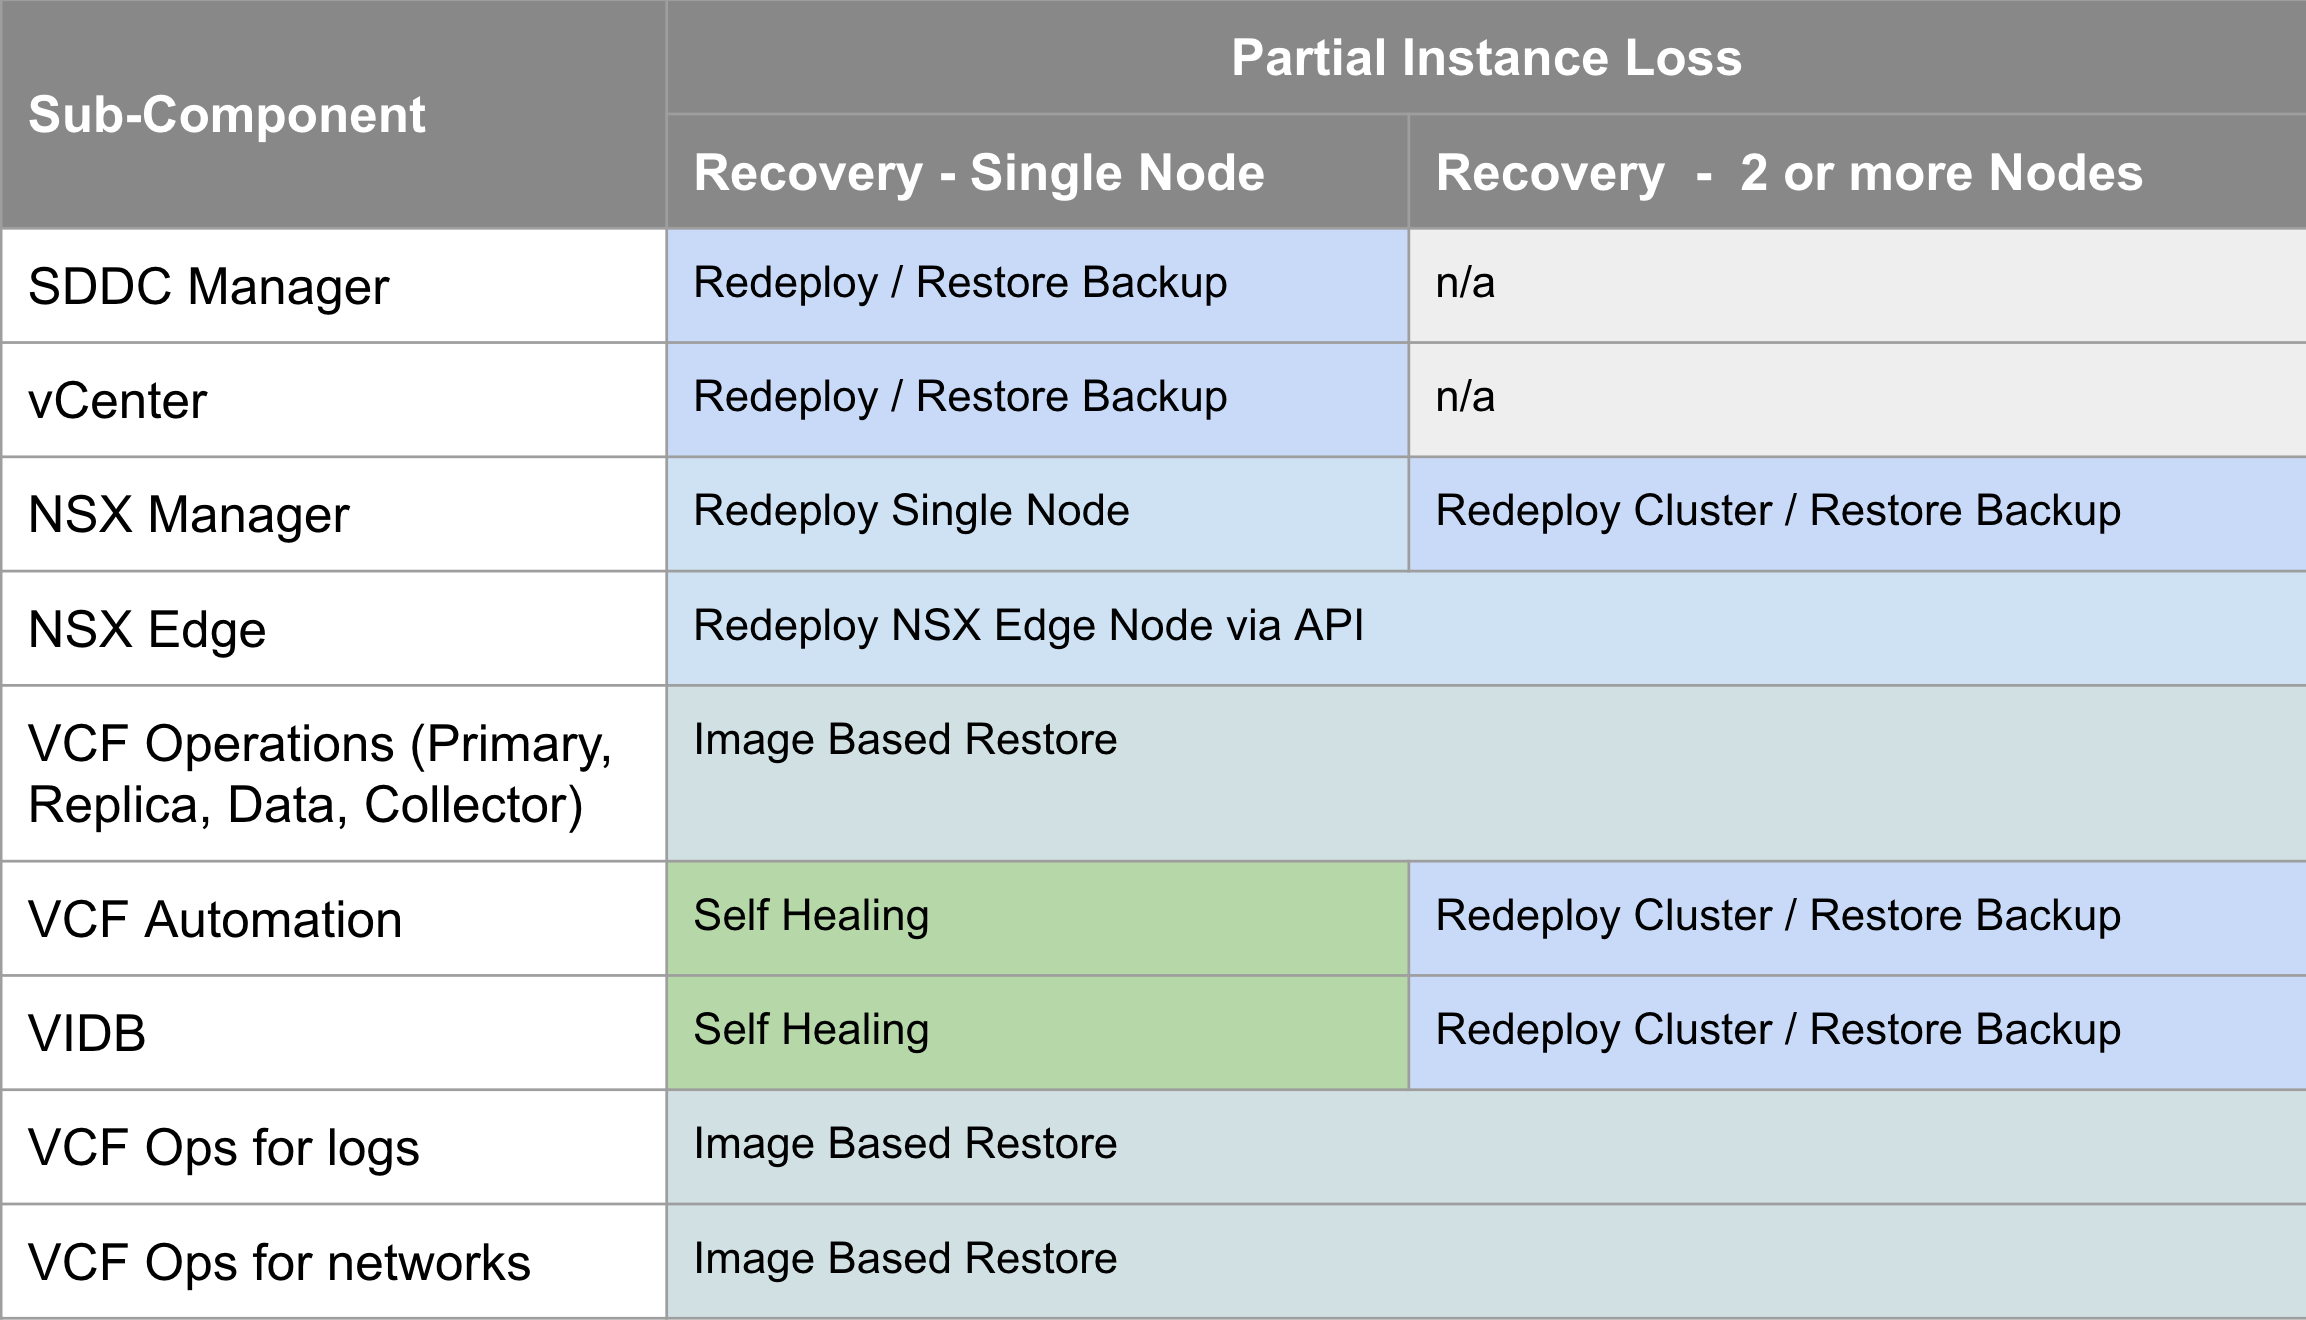
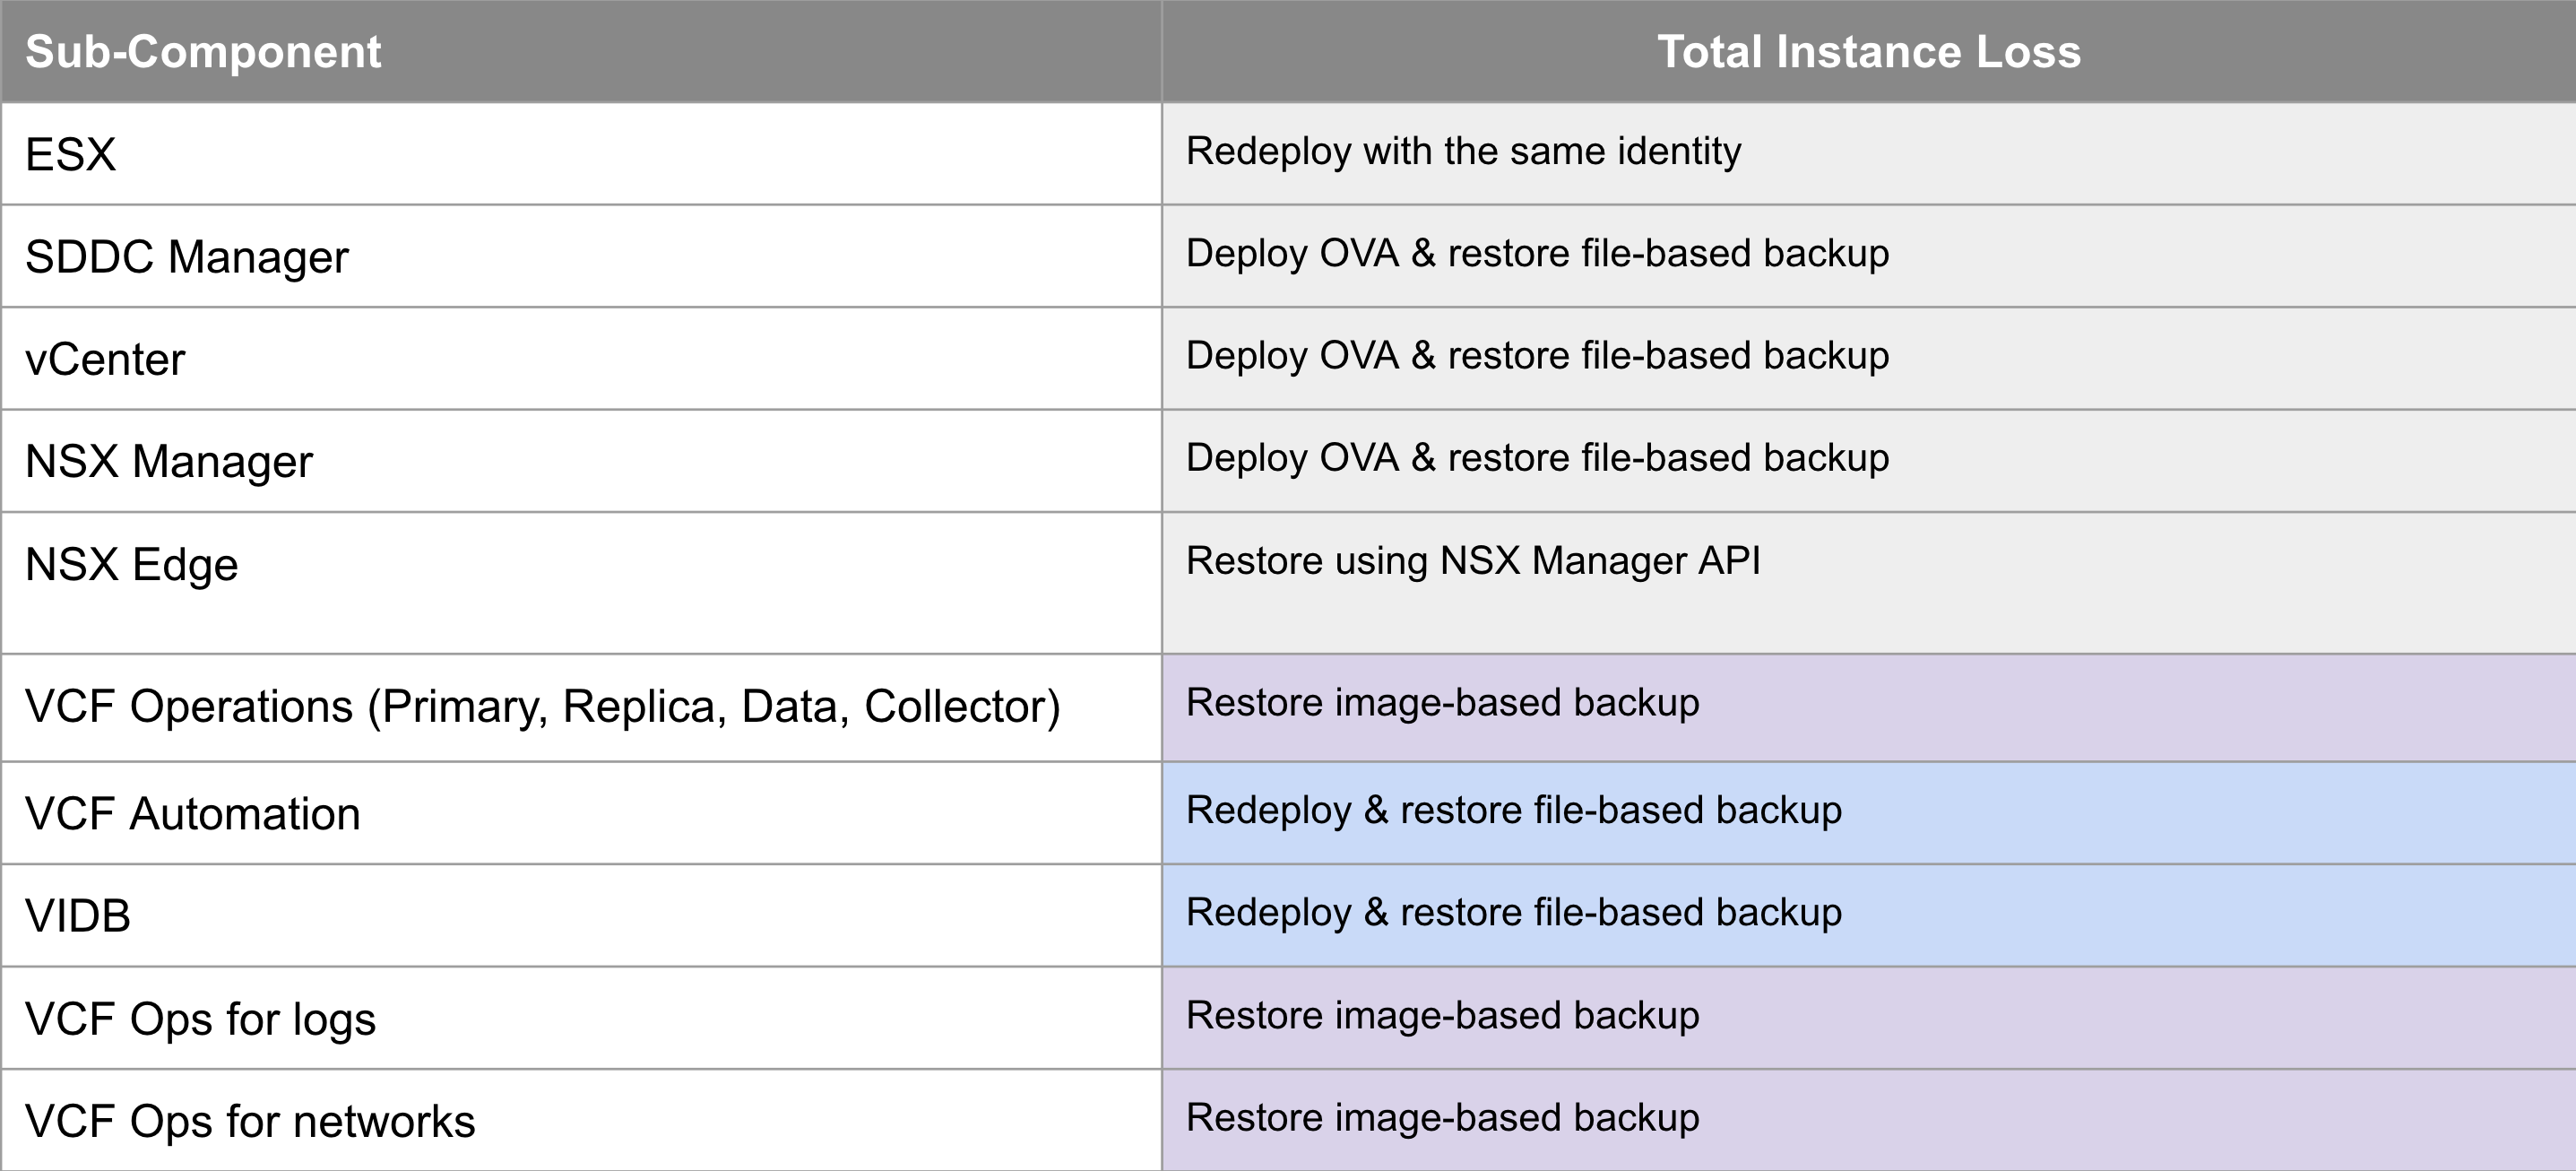
VCF Instance Recovery takes things a step further where an entire VCF Instance has failed and needs to be recovered. This could be due to a site outage (where a recovery site is not available), a catastrophic hardware failure, or a cyber attack. Many financial customers also have regulatory requirements like DORA (Digital Operational Resilience Act) where they must be able to demonstrate to the regulator that they can bring their critical infrastructure back in the case of a cyber attack. The table below shows what is required for each VCF 9.0 component in the event of an entire VCF Instance failure.

The VCF 9.0 documentation for VCF Instance Recovery leverages backups for the components that support it, and redeploy for those that don’t to bring the VCF instance back with the same identity as it had before it went down. We also provide a PowerShell module to automate many of the manual, potentially error-prone & onerous tasks to expedite the recovery time. The documentation is available here https://techdocs.broadcom.com/us/en/vmware-cis/vcf/vcf-9-0-and-later/9-0/fleet-management/-vmware-cloud-foundation-instance-recovery.html

VCF Disaster Recovery

VCF Disaster Recovery is used to protect a VCF Instance across physical sites/regions. It requires a second, recovery VCF Instance available in another site/region with IP mobility between the instances. How you provide the IP mobility is up to you. As VMware, we would love you to use NSX Federation, but you can just as easily use fabric enabled stretched L2. For VCF 9.0 we use a combination of VMware Live Recovery & redeploy/restore from backup to recover the management components from the protected to the recovery sites. The same process can be used to recover business workloads.

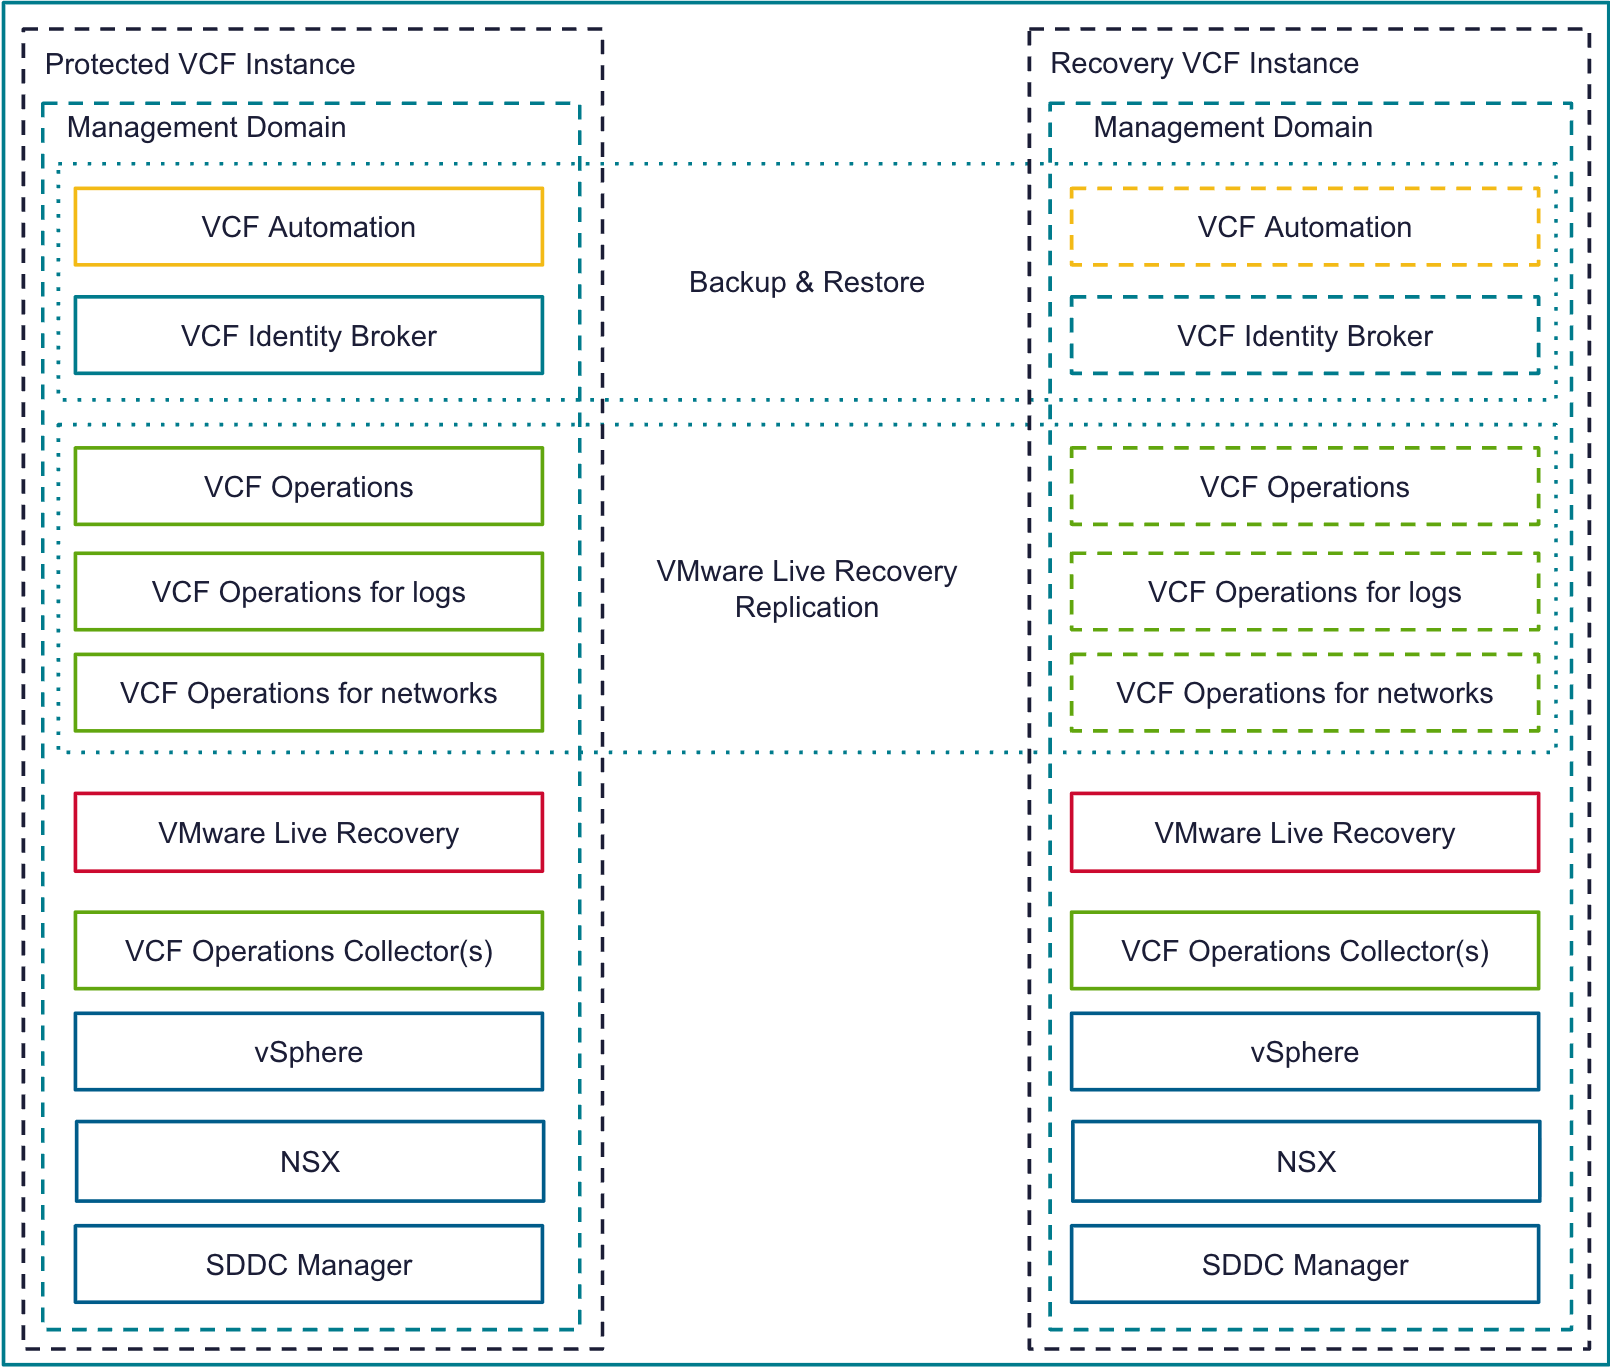
The table below shows how each VCF 9.0 component is recovered on the recovery site in the event of an entire VCF site failure.

The VCF 9.0 documentation for VCF Disaster Recovery was published as a validated solution. It leverages live recovery replication and recovery plans for the components that support it, and redeploy & restore from backup for those that don’t. The documentation is available here https://techdocs.broadcom.com/us/en/vmware-cis/vcf/vvs/9-X/site-protection-and-disaster-recovery-for-vmware-cloud-foundation.html

In the next major VCF release we are planning to bring these VCF Recovery Model pillars together so they are easier to find and compare side by side, and also add additional ones around ransomware recovery and lateral security to round out the VCF Protection & Recovery story. Credit to my colleague Tom Harrington for the colourful tables!

Where Are My VMware Cloud Foundation 5.x Logs?

From time to time we all need to look at logs, whether its a failed operation or to trace who did what when. In VMware Cloud Foundation there are many different logs, each one serving a different purpose. Its not always clear which log you should look at for each operation so here is a useful reference table.

Log TypeVM Locationlog Location
BringupCloud Builder/var/log/vmware/vcf/bringup/vcf-bringup-debug.log
LicensingSDDC Manager/var/log/vmware/vcf/operationsmanager/operationsmanager.log
Network PoolSDDC Manager/var/log/vmware/vcf/commonsvcs/vcf-commonsvcs.log
Host Commission/DecommissionSDDC Manager/var/log/vmware/vcf/operationsmanager/operationsmanager.log
VI (WLD domain)SDDC Manager/var/log/vmware/vcf/domainmanager/domainmanager.log
vRLISDDC Manager/var/log/vmware/vcf/domainmanager/domainmanager.log
vROPSSDDC Manager/var/log/vmware/vcf/domainmanager/domainmanager.log
vRASDDC Manager/var/log/vmware/vcf/domainmanager/domainmanager.log
vRSLCM DeploymentSDDC Manager/var/log/vmware/vcf/domainmanager/domainmanager.log
vRSLCM OperationsvRSLCM/var/log/vrlcm/vmware_vrlcm.log
LCMSDDC Manager/var/log/vmware/vcf/lcm/lcm.log
API LoginSDDC Manager/var/log/vmware/vcf/commonsvcs/vcf-commonsvcs.log
SoSSDDC Manager/var/log/vmware/vcf/sddc-support/vcf-sos-svcs.log
Certificate OperationsSDDC Manager/var/log/vmware/vcf/operationsmanager/operationsmanager.log

PowerVCF 2.0 Authentication Changes

One of the many major enhancements in VMware Cloud Foundation 4.0 is a switch from basic authentication to token based authentication for the VCF API.

Basic authentication is a header field in the form of Authorization: Basic <credentials>, where credentials is the base64 encoding of a username and password. The credentials are not encrypted, therefore Basic Authentication is not the industry standard for API authentication.

VCF 4.0 has moved to using token based authentication (JWT Tokens to be exact) for securing the API. The token implementation is as follows:

  1. An authorized user executes a POST API call to /v1/tokens
  2. The response contains an access token and a refresh token
    1. The access token is valid for 1 hour
      1. The access token is passed in every API call header in the form of Authorization: Bearer <access token>
    2. The refresh token is valid for 24 hours
      1. The refresh token is used to request a new access token once it has expired

PowerVCF 2.0 abstracts all of this in the following way:

  • An authorized user connects to SDDC Manager to request the tokens by running:

Connect-VCFManager -fqdn sfo-vcf01.sfo.rainpole.io -username svc-vcf-api@rainpole.io -password VMw@re1!

  • The access & refresh tokens are stored in memory and used when running subsequent API calls. As each API call is executed PowerVCF checks the expiry of the access token. If the access token is about to expire, it uses the refresh token to request a new access token and proceeds with the API call. So the user does not need to worry about token management.

We have also introduced roles that can be assigned to users. Initially we have ADMIN & OPERATOR, with more roles planned for a future release.

ADMIN = Full Administrator Access to all APIs

OPERATOR = All Access except Password Management, User Management, Backup Management

To request an API token you must have a user account that is assigned either the ADMIN or OPERATOR role in SDDC Manager. The default administrator@vsphere.local user is assigned the ADMIN role during bringup but it is advisable to add additional users for performing day to day tasks.

Once you have a user added you can then authenticate with SDDC Manager to retrieve your access & refresh tokens.

Tip: You can connect using the administrator@vsphere.local user to add new users using PowerVCF. You can use the New-VCFUser PowerVCF cmdlet to create the user and assign a role like so:


Connect-VCFManager -fqdn sfo-vcf01.sfo.rainpole.io -username administrator@vsphere.LOCAL -password VMw@re1!

New-VCFUser -user vcf-admin@rainpole.io -role ADMIN

Once your user is configured PowerVCF will do the rest when it comes to managing the API access tokens.


PowerShell Script to Configure an NSX-T Load Balancer for the vRealize Suite & Workspace ONE Access

As part of my role in the VMware Hyper-converged Business Unit (HCIBU) I spend a lot of time working with new product versions testing integrations for next-gen VMware Validated Designs and Cloud Foundation. A lot of my focus is on Cloud Operations and Automation (vROPs, vRLI, vRA etc) and consequently I regularly need to deploy environments to perform integration testing. I will typically leverage existing automation where possible and tend to create my own when i find gaps. Once such gap was the ability to use PowerShell to interact with the NSX-T API. For anyone who is familiar with setting up a load balancer for the vRealize Suite in NSX-T – there are a lot of manual clicks required. So i set about creating some PowerShell functions to make it a little less tedious and to speed up getting my environments setup so i could get to the testing faster.

There is comprehensive NSX-T API documentation posted on code.vmware .com that I used to decipher the various API endpoints required to complete the various tasks:

  • Create the Load Balancer
  • Create the Service Monitors
  • Create the Application Profiles
  • Create the Server Pools
  • Create the Virtual Servers

The result is a PowerShell module with a function for each of the above and a corresponding JSON file that is read in for the settings for each function. I have included a sample JSON file to get you started. Just substitute your values.

Note: You must have a Tier-1 & associated segments created. (I’ll add that functionality when i get a chance!)

PowerShell Module, Sample JSON & Script are posted to Github here

Automate your VMware Validated Design NSX-V Distributed Firewall Configuration

A few weeks back I mentioned on twitter that i was working on automating the VMware Validated Design NSX-V Distributed Firewall Configuration in my lab. (I admit it took longer than i had planned!) Currently this is a manual post deployment step once VMware Cloud Builder has completed the deployment. This will likely be picked up by Cloud Builder in a future release but for now its a manual, and somewhat tedious, but required, step!

Full details on the manual steps required for this configuration can be found here. Please take the time to understand what these rules are doing before implementing them.

So in an effort to make this post configuration step a little less painful i set out to automate it. I’ve played with the NSX-V API in the past and found it much easier to interact with by using PowerNSX, rather than leveraging PostMan and the API directly. PowerNSX is the unofficial, official automation tool for NSX. Hats off to VMware engineers Nick Bradford, Dale Coghlan & Anthony Burke for creating and documenting this tool. Anthony also published a FREE book on Automating NSX for vSphere with PowerNSX. More on that here.

Disclaimer: This script is not officially supported by VMware. Use at your own risk & test in a development/lab environment before using in production.

I’ve posted the script to GitHub here as its a bit lengthy! There may be a more efficient way to do some parts of it and if anyone wants to contribute please feel free!

As with a lot of the scripts i create it is menu based and has 2 main options:

  1. Create DFW exclusions, IP Sets & Security Groups
  2. Create DFW Rules

The reason i split it into 2 distinct operations is to allow you to inspect the exclusion list, IP Sets & Security Groups before creating the firewall rules. This will ensure that you dont lock yourself out of vCenter by creating an incorrect rule.

Required Software

  • PowerCli
    • The script will check for PowerCli and if not found will attempt to install the latest version from the PowerShell Gallery
    • Currently tested on Windows only
    • If you dont have internet access you can manually install PowerCli by opening a PowerShell console as administrator and running:
    • Find-Module -Name VMware.PowerCLI | Install-Module
  • PowerNSX
    • The script will check for PowerNSX and if not found will attempt to install the latest version from the PowerShell Gallery
    • Currently tested on Windows only
    • If you dont have internet access you can manually install PowerNSX by opening a PowerShell console as administrator and running:
    • Find-Module -Name PowerNSX | Install-Module

Required Variables

Before you can run the script you need to edit the User Variables to provide the following:

  • Target vCenter details
    • Required to establish a PowerCli Connection with vCenter Server. This is used when updating the DFW exclusion list
  • Target NSX Manager details
    • Required to establish a connection with NSX manager to configure the DFW
  • IP Addresses for the various SDDC components

Hopefully you will find this useful!

What not to do when your Platform Services Controllers are Load Balanced!

I needed to do some validation around vRealize Operations Manager & vRealize Orchestrator for an upcoming VVD release and a physical lab environment was made available. The environment is a dual region VVD deployment. Upon verifying that I had access to all the components I needed it became obvious there was an issue with SSO in the primary region (SFO). Browsing to the web client for the SFO management vCenter I was seeing this:

As i mentioned this is a VVD deployment and per VVD guidelines there are 2 Platform Services Controllers (PSCs) behind an NSX load balancer per region. Like so: (Diagram from the VMware Validated Design 5.0 Architecture & Design guide)

Like any good (lazy!) IT person the first thing i did was google the error to find the quick fix! That led me to this communities post which had some suggestions around disk space etc. None of which were relevant to my issue. Running the following on the PSCs and vCenters showed that some services were not starting

service-control –status

Restarting the services didn’t help. Next up i checked the usual suspects:

  • NTP
  • DNS
  • SSL Certificates

All of the above looked ok. Next I turned my attention to the load balancer. Because the vCenter Web Client was inaccessible I was not able to access the load balancer settings through the UI so I turned to the NSX API using Postman

To connect to the NSX manager that is associated with the load balancer you need to configure a Postman session with basic authentication and enter the NSX manager admin user & password.

To retrieve information on the load balancer you need to run the following GET:

https://sfo01m01nsx01.sfo01.rainpole.local/api/4.0/edges/edge-1/loadbalancer/config

I wont post the full response from the above command as it’s lengthy but scanning through it I noticed that the condition of each load balancer pool member was disabled. In the immortal words of Bart Simpson:


The response above is from a more targeted API call to /pools/pool-1.

Now I dont know how it got into this state – maybe someone was doing some jenga style doomsday testing, pulling one brick at a time until the tower crashes! – but this certainly looked to be the cause of the issue. So I figured the quickest fix would be to do a PUT API call to NSX with condition enabled for the pool members and I’d be all set. Not so easy!

Running the following PUT appears to work temporarily (running a GET at the same time confirms this)

But the change does not get fully applied and reverts the conditions to disabled after about 30 seconds with the below error:

So to apply the change to the load balancer NSX requires a handoff with the PSC that is is mapped to…in this case its the load balanced PSC that is not functional. So the command fails.

So it was clear I needed to get at least 1 PSC operational before i could attempt to make a change. Time to play with some DNS redirects to “fool” the PSC services into starting.

As my PSCs are setup in HA mode behind a load balancer the SSO endpoint URL is https://sfo01psc01.sfo01.rainpole.local which both PSCs will respond from. So to get my first PSC up I changed the IP for sfo01psc01.sfo01.rainpole.local in DNS to point to the first PSC’s IP.

So now, pings to the load balancer VIP FQDN sfo01psc01.sfo01.rainpole.local respond from the first PSC IP

Next I set a static entry in /etc/hosts on each of my PSCs, and vCenters to do the same as i’ve seen vCenter especially cache DNS entries in it’s local dnsmasq.

Next step was to stop & start all services on each PSC

service-control –stop –all

service-control –start –all

And hey presto the services started! Ran the same on vCenter and the services also started. This allowed me to go in and modify the load balancer pools to set the members to enabled.

Once the load balancer was back as it should be it was just a case of removing the /etc/hosts entries on each VM and reverting the DNS server change to point the load balancer FQDN back to its correct IP address.

For completeness I restarted all the services on each appliances in the above mentioned order

Moral of the story? Dont disable both nodes in a load balancer pool!

Now onwards with the original testing i needed to do!

VMware Validated Design – Automated Deployment with Cloud Builder – Part 6: Deploy The SDDC

This is part 6 of a series of posts on VMware Cloud Builder. 

In this final post, now that we have passed all validation, we will run the SDDC deployment using VMware Cloud Builder.

Continue reading “VMware Validated Design – Automated Deployment with Cloud Builder – Part 6: Deploy The SDDC”

VMware Validated Design – Automated Deployment with Cloud Builder – Part 5: Cloud Builder Deployment & Environment Validation

This is part 5 of a series of posts on VMware Cloud Builder.

Hopefully you’re still with me!

In this post I will cover the deployment and initial configuration of the VMware Cloud Builder appliance, ingestion of the deployment parameters file, and environment validation.

Continue reading “VMware Validated Design – Automated Deployment with Cloud Builder – Part 5: Cloud Builder Deployment & Environment Validation”

VMware Validated Design – Automated Deployment with Cloud Builder – Part 4: Generating SSL Certificates

This is part 4 of a series of posts on VMware Cloud Builder.

In this post I will cover generating the required SSL certificates for deploying this VMware Validated Design with VMware Cloud Builder.

Friendly warning: This is a long post so maybe get a coffee before reading!

Continue reading “VMware Validated Design – Automated Deployment with Cloud Builder – Part 4: Generating SSL Certificates”

VMware Validated Design – Automated Deployment with Cloud Builder – Part 3: Deployment Parameters File

This is part 3 of a series of posts on VMware Cloud Builder.

In this post I will cover the deployment parameters file.

Continue reading “VMware Validated Design – Automated Deployment with Cloud Builder – Part 3: Deployment Parameters File”