SSH access to the Supervisor Control Plane VMs uses an auto-generated password. The password for the system user on these VMs needs to be retrieved from associated vCenter.
IMPORTANT: Direct access to the vSphere Supervisor Control Plane VMs should be used with caution and for troubleshooting purposes only.
SSH to the vCenter as the root user, and enter the bash shell by typing shell
You should now be able to SSH to the IP of the vSphere Supervisor Control Plane VM (The IP returned will be the floating IP or FIP) with username root.
I got a question from someone internally if renewing the VMCA signed certificate on SDDC Manager in a VCF instance is possible. For context, out-of-the-box SDDC Manager is signed by the VMCA on the management domain vCenter Server, but there is no supported way to renew that certificate. So before the VMCA certificate expires, you must replace it with a signed CA cert from your internal CA, or from an external 3rd party CA.
That said, it is possible to leverage VMCA to renew the cert on SDDC Manager. Here are some notes I had from doing this previously in the lab.
Disclaimer: This is not officially supported by VMware/Broadcom, use at your own risk.
First generate a CSR for SDDC Manager in the normal way using the SDDC Manager UI
Download the CSR as sfo-vcf01.sfo.rainpole.io.csr
SSH to the Management vCenter Server and do the following
mkdir /tmp/certs
upload CSR to /tmp/certs
cd /tmp/certs
vi /tmp/certs/cert.cfg

# cert.cfg contents replacing FQDN appropriately
[ req ]
req_extensions = v3_req

[ v3_req ]
extendedKeyUsage = serverAuth, clientAuth
authorityKeyIdentifier=keyid,issuer
authorityInfoAccess = caIssuers;URI:https://sfo-m01-vc01.sfo.rainpole.io/afd/vecs/ca

Save /tmp/certs/cert.cfg
On the management vCenter Server, generate the cert
HashiCorp Terraform is not currently available on the Photon OS repository. If you would like to install Terraform on a PhotonOS appliance you can use the script below. Note: The versions for Go and Terraform that I have included are current at the time of writing. Thanks to my colleague Ryan Johnson who shared this method with me some time ago for another project.
#!/usr/bin/env bash

# Versions
GO_VERSION="1.21.4"
TERRAFORM_VERSION="1.6.3"

# Arch
if [[ $(uname -m) == "x86_64" ]]; then
  LINUX_ARCH="amd64"
elif [[ $(uname -m) == "aarch64" ]]; then
  LINUX_ARCH="arm64"
fi

# Directory
if ! [[ -d ~/code ]]; then
  mkdir ~/code
fi

# Go
wget -q -O go${GO_VERSION}.linux-${LINUX_ARCH}.tar.gz https://golang.org/dl/go${GO_VERSION}.linux-${LINUX_ARCH}.tar.gz
tar -C /usr/local -xzf go${GO_VERSION}.linux-${LINUX_ARCH}.tar.gz
PATH=$PATH:/usr/local/go/bin
go version
rm go${GO_VERSION}.linux-${LINUX_ARCH}.tar.gz
export GOPATH=${HOME}/code/go

# HashiCorp
wget -q https://releases.hashicorp.com/terraform/${TERRAFORM_VERSION}/terraform_${TERRAFORM_VERSION}_linux_${LINUX_ARCH}.zip
unzip -o -d /usr/local/bin/ terraform_${TERRAFORM_VERSION}_linux_${LINUX_ARCH}.zip
rm ./*.zip
As part of my series on deploying and managing VMware Cloud Foundation using Terraform, this post will focus on deploying the VMware Cloud Foundation Cloud Builder appliance using the vSphere Terraform provider. I’ve used this provider in the past to deploy the NSX Manager appliance.
Check out the other posts on Terraform with VMware Cloud Foundation here:
Note the vCenter Server credentials in the above variables.tf do not have default values. We will declare these sensitive values in a terraform.tfvars file and add *.tfvars to our .GitIgnore file so they are not synced to our Git repo.
Now that we have all of our variables defined we can define our main.tf to perform the deployment. As part of this, we first need to gather some data from the target vCenter Server, so we know where to deploy the appliance.
# main.tf

# Data source for vCenter Datacenter
data "vsphere_datacenter" "datacenter" {
  name = var.data_center
}

# Data source for vCenter Cluster
data "vsphere_compute_cluster" "cluster" {
  name          = var.cluster
  datacenter_id = data.vsphere_datacenter.datacenter.id
}

# Data source for vCenter Datastore
data "vsphere_datastore" "datastore" {
  name          = var.datastore
  datacenter_id = data.vsphere_datacenter.datacenter.id
}

# Data source for vCenter Portgroup
data "vsphere_network" "mgmt" {
  name          = var.mgmt_pg
  datacenter_id = data.vsphere_datacenter.datacenter.id
}

# Data source for vCenter Resource Pool. In our case we will use the root resource pool
data "vsphere_resource_pool" "pool" {
  name          = format("%s%s", data.vsphere_compute_cluster.cluster.name, "/Resources")
  datacenter_id = data.vsphere_datacenter.datacenter.id
}

# Data source for ESXi host to deploy to
data "vsphere_host" "host" {
  name          = var.compute_host
  datacenter_id = data.vsphere_datacenter.datacenter.id
}

# Data source for the OVF to read the required OVF Properties
data "vsphere_ovf_vm_template" "ovfLocal" {
  name             = var.vm_name
  resource_pool_id = data.vsphere_resource_pool.pool.id
  datastore_id     = data.vsphere_datastore.datastore.id
  host_system_id   = data.vsphere_host.host.id
  local_ovf_path   = var.local_ovf_path
  ovf_network_map = {
    "Network 1" = data.vsphere_network.mgmt.id
  }
}

# Deployment of VM from Local OVA
resource "vsphere_virtual_machine" "cb01" {
  name                 = var.vm_name
  datacenter_id        = data.vsphere_datacenter.datacenter.id
  datastore_id         = data.vsphere_ovf_vm_template.ovfLocal.datastore_id
  host_system_id       = data.vsphere_ovf_vm_template.ovfLocal.host_system_id
  resource_pool_id     = data.vsphere_ovf_vm_template.ovfLocal.resource_pool_id
  num_cpus             = data.vsphere_ovf_vm_template.ovfLocal.num_cpus
  num_cores_per_socket = data.vsphere_ovf_vm_template.ovfLocal.num_cores_per_socket
  memory               = data.vsphere_ovf_vm_template.ovfLocal.memory
  guest_id             = data.vsphere_ovf_vm_template.ovfLocal.guest_id
  scsi_type            = data.vsphere_ovf_vm_template.ovfLocal.scsi_type

  wait_for_guest_net_timeout = 5

  ovf_deploy {
    allow_unverified_ssl_cert = true
    local_ovf_path            = var.local_ovf_path
    disk_provisioning         = "thin"
    ovf_network_map   = data.vsphere_ovf_vm_template.ovfLocal.ovf_network_map

  }
  vapp {
    properties = {
      "ip0"               = var.ip0,
      "netmask0"          = var.netmask0,
      "gateway"          = var.gateway,
      "dns"             = var.dns,
      "domain"           = var.domain,
      "ntp"              = var.ntp,
      "searchpath"       = var.searchpath,
      "ADMIN_USERNAME"  = "admin",
      "ADMIN_PASSWORD"           = var.ADMIN_PASSWORD,
      "ROOT_PASSWORD"       = var.ROOT_PASSWORD,
      "hostname"           = var.hostname
    }
  }
  lifecycle {
    ignore_changes = [
      #vapp # Enable this to ignore all vapp properties if the plan is re-run
      vapp[0].properties["ADMIN_PASSWORD"],
      vapp[0].properties["ROOT_PASSWORD"],
      host_system_id # Avoids moving the VM back to the host it was deployed to if DRS has relocated it
    ]
  }
}
Now we can run the following to initialise Terraform and the required vSphere provider
terraform init
One the provider is initialised, we can then create a terraform plan to ensure our configuration is valid.
terraform plan -out=DeployCB
Now that we have a valid configuration we can apply our plan to deploy the Cloud Builder appliance.
I was chatting with my colleague Paudie O’Riordan yesterday about PowerVCF as he was doing some testing internally and he mentioned that a great addition would be to have the ability to find, and cleanup failed tasks in SDDC Manager. Some use cases for this would be, cleaning up an environment before handing it off to a customer, or before recording a demo etc.
Currently there isnt a supported public API to delete a failed task so you have to run a curl command on SDDC Manager with the task ID. So getting a list of failed tasks and then running a command to delete each one can take time. See Martin Gustafson’s post on how to do it manually here.
I took a look at our existing code for retrieving tasks (and discovered a bug in the logic that is now fixed in PowerVCF 2.1.5!) and we have the ability to specify -status. So requesting a list of tasks with -status “failed” returns a list. So i put the script below together to retrieve a list of failed tasks, loop through them and delete them. The script requires the following inputs
SDDC Manager FQDN. This is the target that is queried for failed tasks
SDDC Manager API User. This is the user that is used to query for failed tasks. Must have the SDDC Manager ADMIN role
Password for the above user
Password for the SDDC Manager appliance vcf user. This is used to run the task deletion. This is not tracked in the credentials DB so we need to pass it.
Once the above variables are populated the script does the following:
Checks for PowerVCF (minimum version 2.1.5) and installs if not present
Requests an API token from SDDC Manager
Queries SDDC Manager for the management domain vCenter Server details
Uses the management domain vCenter Server details to retrieve the SDDC Manager VM name
Queries SDDC Manager for a list of tasks in a failed state
Loops through the list of failed tasks and deletes them from SDDC Manager
Verifies the task is no longer present
Here is the script. It is also published here if you would like to enhance it
# Script to cleanup failed tasks in SDDC Manager
# Written by Brian O'Connell - Staff Solutions Architect @ VMware

#User Variables
# SDDC Manager FQDN. This is the target that is queried for failed tasks
$sddcManagerFQDN = "lax-vcf01.lax.rainpole.io"
# SDDC Manager API User. This is the user that is used to query for failed tasks. Must have the SDDC Manager ADMIN role
$sddcManagerAPIUser = "administrator@vsphere.local"
$sddcManagerAPIPassword = "VMw@re1!"
# Password for the SDDC Manager appliance vcf user. This is used to run the task deletion
$sddcManagerVCFPassword = "VMw@re1!"


# DO NOT CHANGE ANYTHING BELOW THIS LINE
#########################################

# Set TLS to 1.2 to avoid certificate mismatch errors
[Net.ServicePointManager]::SecurityProtocol = [Net.SecurityProtocolType]::Tls12

# Install PowerVCF if not already installed
if (!(Get-InstalledModule -name PowerVCF -MinimumVersion 2.1.5 -ErrorAction SilentlyContinue)) {
    Install-Module -Name PowerVCF -MinimumVersion 2.1.5 -Force
}

# Request a VCF Token using PowerVCF
Request-VCFToken -fqdn $sddcManagerFQDN -username $sddcManagerAPIUser -password $sddcManagerAPIPassword

# Disconnect all connected vCenters to ensure only the desired vCenter is available
if ($defaultviservers) {
    $server = $defaultviservers.Name
    foreach ($server in $defaultviservers) {
        Disconnect-VIServer -Server $server -Confirm:$False
    }
}

# Retrieve the Management Domain vCenter Server FQDN
$vcenterFQDN = ((Get-VCFWorkloadDomain | where-object {$_.type -eq "MANAGEMENT"}).vcenters.fqdn)
$vcenterUser = (Get-VCFCredential -resourceType "PSC").username
$vcenterPassword = (Get-VCFCredential -resourceType "PSC").password

# Retrieve SDDC Manager VM Name
if ($vcenterFQDN) {
    Write-Output "Getting SDDC Manager Manager VM Name"
    Connect-VIServer -server $vcenterFQDN -user $vcenterUser -password $vcenterPassword | Out-Null
    $sddcmVMName = ((Get-VM * | Where-Object {$_.Guest.Hostname -eq $sddcManagerFQDN}).Name)
}

# Retrieve a list of failed tasks
$failedTaskIDs = @()
$ids = (Get-VCFTask -status "Failed").id
Foreach ($id in $ids) {
    $failedTaskIDs += ,$id
}
# Cleanup the failed tasks
Foreach ($taskID in $failedTaskIDs) {
    $scriptCommand = "curl -X DELETE 127.0.0.1/tasks/registrations/$taskID"
    Write-Output "Deleting Failed Task ID $taskID"
    $output = Invoke-VMScript -ScriptText $scriptCommand -vm $sddcmVMName -GuestUser "vcf" -GuestPassword $sddcManagerVCFPassword

# Verify the task was deleted
    Try {
    $verifyTaskDeleted = (Get-VCFTask -id $taskID)
    if ($verifyTaskDeleted -eq "Task ID Not Found") {
        Write-Output "Task ID $taskID Deleted Successfully"
    }
}
    catch {
        Write-Error "Something went wrong. Please check your SDDC Manager state"
    }
}
Disconnect-VIServer -server $vcenterFQDN -Confirm:$False
Along with the release of VMware Cloud Foundation 4.3.1, we are excited to announce the general availability of the Site Protection & Disaster Recovery for VMware Cloud Foundation Validated Solution. The solution documentation, intro and other associated collateral can be found on the Cloud Platform Tech Zone here.
The move from VMware Validated Designs to VMware Validated Solutions has been covered by my team mate Gary Blake in detail here so I wont go into that detail here. Instead I will concentrate on the work Ken Gould and I (along with a supporting team) have been working to deliver for the past few months.
The Site Protection & Disaster Recovery for VMware Cloud Foundation Validated Solution includes the following to deliver an end-to-end validated way to protect your mission critical applications. You get a set of documentation that is tailored to the solution that includes: design objectives, a detailed design including not just design decisions, but the justifications & implications of those decisions, detailed implementation steps with PowerShell alternatives for some steps to speed up time to deploy, operational guidance on how to use the solution once its deployed, solution interoperability between it and other Validated Solutions, an appendix containing all the solution design decisions in one easy place for review, and finally, a set of frequently asked questions that will be updated for each release.
Disaster recovery is a huge topic for everyone lately. Everything from power outages to natural disasters to ransomware and beyond can be classed as a disaster, and regardless of the type of disaster you must be prepared. To adequately plan for business continuity in the event of a disaster you must protect your mission critical applications so that they may be recovered. In a VMware Cloud Foundation environment, cloud operations and automation services are delivered by vRealize Lifecycle Manager, vRealize Operations Manager & vRealize Automation, with authentication services delivered by Workspace ONE Access.
To provide DR for our mission critical apps we leverage 2 VCF instances with NSX-T federation between them. The primary VCF instance runs the active NSX-T global manager and the recovery VCF instance runs the standby NSX-T global manager. All load balancing services are served from the protected instance, with a standby load balancer (disconnected from the recovery site NSX Tier-1 until required, to avoid IP conflicts) in the recovery instance. Using our included PowerShell cmdlets you can quickly create and configure the standby load balancer to mimic your active load balancer, saving you a ton of manual UI clicks.
In the (hopefully never) event of the need to failover the cloud management applications, you can easily bring the standby load balancer online to enable networking services for the failed over applications.
Using Site recovery Manager (SRM) you can run planned migrations or disaster recovery migrations. With a single set of SRM recovery plans, regardless of the scenario, you will be guided through the recovery process. In this post I will cover what happens in the event of a disaster.
When a disaster occurs on the protected site (once the panic subsides) there are a series of tasks you need to perform to bring those mission critical apps back online.
First? Fix the network! Log into the passive NSX Global Manager (GM) on the recovery site and promote the GM to Active. (Note: This can take about 10-15 mins)
To cover the case of an accidental “Force Active” click..we’ve built in the “Are you absolutely sure this is what you want to do?” prompt!
Once the promotion operation completes our standby NSX GM is now active, and can be used to manage the surviving site NSX Local Manager (LM)
Once the recovery site GM is active we need to ensure that the cross-instance NSX Tier-1 is now directing the egress traffic via the recovery site. To do this we must update the locations on the Tier-1. Navigate to GM> Tier-1 gateways > Cross Instance Tier-1. Under Locations, make the recovery location Primary.
The next step is to ensure we have an active load balancer running in the recovery site to ensure our protected applications come up correctly. To do this log into what is now our active GM, select the recovery site NSX Local Manager (LM), and navigate to Networking > Load Balancing. Edit the load balancer and attach it to the recovery site standalone Tier-1.
At this point we are ready to run our SRM recovery plans. The recommended order for running the recovery plans (assuming you have all of the protected components listed below) is as follows. This ensures lifecycle & authentication services (vRSLCM & WSA) are up before the applications that depend on them (vROPS & vRA)
vRSLCM – WSA – RP
Intelligent Operations Management RP
Private Cloud Automation RP
I’m not going to go through each recovery plan in detail here. They are documented in the Site Protection and Disaster Recovery Validated Solution. In some you will be prompted to verify this or that along the way to ensure successful failover.
The main thing in a DR situation is, DO NOT PANIC. And what is the best way to getting to a place where you DO NOT PANIC? Test your DR plans…so when you see this…
Your reaction is this…
Trust the plan…test the plan…relax…you have a plan!
Hopefully this post was useful..if you want to learn more please reach out in the comments…if you’re attending VMworld and would like to learn more or ask some questions, please drop into our Meet The Experts session on Thursday.
In Part 1 of this series we saw how to retrieve a sessionId from the Site Recovery Manager VAMI interface using Postman & Powershell. In this post we will use that sessionId to replace the appliance SSL certificate using the API. To start we again use the VAMI UI to inspect the endpoint URL being used for certificate replacement by doing a manual replacement. In this case the URL is:
Site Recovery Manager expects the certificate in P12 format so I used CertGen to create the cert format needed. When using the UI you browse to the cert file and it uploads in the browser along with the certificate passphrase. Behind the scenes it is then base64 encoded, so you need to do this before using the API.
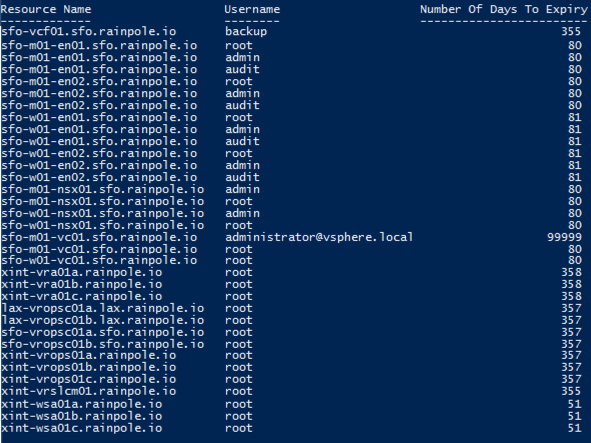
Within a VMware Cloud Foundation instance, SDDC Manager is used to manage the lifecycle of passwords (or credentials). While we provide the ability to rotate (either scheduled or manually) currently there is no easy way to check when a particular password is due to expire, which can lead to appliance root passwords expiring, which will cause all sorts of issues. The ability to monitor expiry is something that is being worked on, but as a stop gap I put together the script below which leverages PowerVCF and also a currently undocumented API for validating credentials.
The script has a function called Get-VCFPasswordExpiry that accepts the following parameters
-fqdn (FQDN of the SDDC Manager)
-username (SDDC Manager Username – Must have the ADMIN role)
-password (SDDC Manager password)
-resourceType (Optional parameter to specify a resourceType. If not passed, all resources will be checked. If passed (e.g. VCENTER) then only that resourceType will be checked. Supported resource types are
PowerVCF is a requirement. If you dont already have it run the following
Install-Module -Name PowerVCF
The code takes a while to run as it needs to do the following to check password expiry
Connect to SDDC Manager to retrieve an API token
Retrieve a list of all credentials
Using the resourceID of each credential
Perform a credential validation
Wait for the validation to complete
Parse the results for the expiry details
Add all the results to an array and present in a table (Kudos to Ken Gould for assistance with the presentation of this piece!)
In this example script I am returning all non SERVICE user accounts regardless of expiry (SERVICE account passwords are system managed). You could get more granular by adding something like this to only display accounts with passwords due to expire in less than 14 days
if ($validationTaskResponse.validationChecks.passwordDetails.numberOfDaysToExpiry -lt 14) {
               Write-Output "Password for username $($validationTaskResponse.validationChecks.username) expires in $($validationTaskResponse.validationChecks.passwordDetails.numberOfDaysToExpiry) days"
           }
As part of my role in the VMware Hyper-converged Business Unit (HCIBU) I spend a lot of time working with new product versions testing integrations for next-gen VMware Validated Designs and Cloud Foundation. A lot of my focus is on Cloud Operations and Automation (vROPs, vRLI, vRA etc) and consequently I regularly need to deploy environments to perform integration testing. I will typically leverage existing automation where possible and tend to create my own when i find gaps. Once such gap was the ability to use PowerShell to interact with the NSX-T API. For anyone who is familiar with setting up a load balancer for the vRealize Suite in NSX-T – there are a lot of manual clicks required. So i set about creating some PowerShell functions to make it a little less tedious and to speed up getting my environments setup so i could get to the testing faster.
There is comprehensive NSX-T API documentation posted on code.vmware .com that I used to decipher the various API endpoints required to complete the various tasks:
Create the Load Balancer
Create the Service Monitors
Create the Application Profiles
Create the Server Pools
Create the Virtual Servers
The result is a PowerShell module with a function for each of the above and a corresponding JSON file that is read in for the settings for each function. I have included a sample JSON file to get you started. Just substitute your values.
Note: You must have a Tier-1 & associated segments created. (I’ll add that functionality when i get a chance!)
PowerShell Module, Sample JSON & Script are posted to Github here
I needed to do some validation around vRealize Operations Manager & vRealize Orchestrator for an upcoming VVD release and a physical lab environment was made available. The environment is a dual region VVD deployment. Upon verifying that I had access to all the components I needed it became obvious there was an issue with SSO in the primary region (SFO). Browsing to the web client for the SFO management vCenter I was seeing this:
As i mentioned this is a VVD deployment and per VVD guidelines there are 2 Platform Services Controllers (PSCs) behind an NSX load balancer per region. Like so: (Diagram from the VMware Validated Design 5.0 Architecture & Design guide)
Like any good (lazy!) IT person the first thing i did was google the error to find the quick fix! That led me to this communities post which had some suggestions around disk space etc. None of which were relevant to my issue. Running the following on the PSCs and vCenters showed that some services were not starting
service-control –status
Restarting the services didn’t help. Next up i checked the usual suspects:
NTP
DNS
SSL Certificates
All of the above looked ok. Next I turned my attention to the load balancer. Because the vCenter Web Client was inaccessible I was not able to access the load balancer settings through the UI so I turned to the NSX API using Postman
To connect to the NSX manager that is associated with the load balancer you need to configure a Postman session with basic authentication and enter the NSX manager admin user & password.
To retrieve information on the load balancer you need to run the following GET:
I wont post the full response from the above command as it’s lengthy but scanning through it I noticed that the condition of each load balancer pool member was disabled. In the immortal words of Bart Simpson:
The response above is from a more targeted API call to /pools/pool-1.
Now I dont know how it got into this state – maybe someone was doing some jenga style doomsday testing, pulling one brick at a time until the tower crashes! – but this certainly looked to be the cause of the issue. So I figured the quickest fix would be to do a PUT API call to NSX with condition enabled for the pool members and I’d be all set. Not so easy!
Running the following PUT appears to work temporarily (running a GET at the same time confirms this)
But the change does not get fully applied and reverts the conditions to disabled after about 30 seconds with the below error:
So to apply the change to the load balancer NSX requires a handoff with the PSC that is is mapped to…in this case its the load balanced PSC that is not functional. So the command fails.
So it was clear I needed to get at least 1 PSC operational before i could attempt to make a change. Time to play with some DNS redirects to “fool” the PSC services into starting.
As my PSCs are setup in HA mode behind a load balancer the SSO endpoint URL is https://sfo01psc01.sfo01.rainpole.local which both PSCs will respond from. So to get my first PSC up I changed the IP for sfo01psc01.sfo01.rainpole.local in DNS to point to the first PSC’s IP.
So now, pings to the load balancer VIP FQDN sfo01psc01.sfo01.rainpole.local respond from the first PSC IP
Next I set a static entry in /etc/hosts on each of my PSCs, and vCenters to do the same as i’ve seen vCenter especially cache DNS entries in it’s local dnsmasq.
Next step was to stop & start all services on each PSC
service-control –stop –all
service-control –start –all
And hey presto the services started! Ran the same on vCenter and the services also started. This allowed me to go in and modify the load balancer pools to set the members to enabled.
Once the load balancer was back as it should be it was just a case of removing the /etc/hosts entries on each VM and reverting the DNS server change to point the load balancer FQDN back to its correct IP address.
For completeness I restarted all the services on each appliances in the above mentioned order
Moral of the story? Dont disable both nodes in a load balancer pool!
Now onwards with the original testing i needed to do!